Automating Lead Assignment for Salesforce Platforms with Lead Assignment Automation for Salesforce
Effective lead assignment within Salesforce is critical to ensure that sales-ready leads are directed to the appropriate individuals at the right moment. This process should never be overlooked. Lead assignment ensures that when a lead is marketing qualified or sales qualified it is contacted. Lead assignment plays a pivotal role in ensuring that sales-ready leads are promptly delivered to the right sales representatives, which underscores the significance of automating this process across various Salesforce platforms, from Account Engagement to Sales Cloud and Marketing Cloud to Sales Cloud.
The primary goal for marketers is to assign inbound leads in the most efficient manner possible, and Salesforce’s lead assignment features empower us to achieve precisely that. With automation! Whether to queues or designated account representatives, this frees up your time to go back to marketing.
If you’ve been manually assigning leads up until now, get ready for a transformative experience.
Lead Assignment Automation for Salesforce
And for those already leveraging automated lead assignment features in your Salesforce accounts, don’t rush to stop reading just yet. Stay tuned to ensure you’re adhering to best practices and making lead assignment (also known as lead routing) as seamless as possible with this insight from Tectonic.
For this insight, we’ll assume you’re using Sales Cloud alongside Account Engagement and/or Marketing Cloud. This involves two essential components to ensure smooth lead assignment: integrating and configuring your Salesforce products to work harmoniously together and setting up Lead Assignment Rules in Salesforce.
Part 1 – Configuring Your Salesforce Products
Integration The initial crucial step is to establish connectivity between your platforms using the Salesforce Connector for Account Engagement or Marketing Cloud Connect, depending on your usage.
Connecting Marketing Cloud Account Engagement and Sales Cloud via the Salesforce Connector is relatively straightforward, enabling the two platforms to communicate and share data seamlessly, eliminating the need for manual data imports and exports by marketers.
You’ll find the Salesforce Connector on the AppExchange, and Salesforce provides an implementation guide, which includes pre-installation considerations. Tectonic can assist.
Ensure you’re utilizing the V2 Connector; if you’re currently using the connector but haven’t upgraded, make that your first step.
Marketing Data Sharing Upon installing the Account Engagement-Salesforce Connector, you’ll encounter ‘Marketing Data Sharing,’ which allows you to control which Leads, Contacts, Opportunities, or custom objects are eligible for syncing from Salesforce to Account Engagement. This feature is ideal for organizations with multiple Business Units and can also benefit those with a single unit. MDS offers greater control over when prospect and lead records are created, contributing to effective lead management.
Understanding Sync Behaviors Once your platforms are connected, make time to fully understand how data syncs between them. You can designate either Account Engagement or Salesforce as the ‘master’ values, ensuring consistency in case of discrepancies between the platforms. Additionally, you can opt to use the ‘most recently updated record’ as the standard. This option ensures data is up to date regardless of which platform it was last updated in.
For Account Engagement and Sales Cloud, prospects’ records typically sync every two to four minutes, with immediate syncing for most records. However, Account Engagement processes sync queues with over 400 records in batches. Standard batch processing syncs 12,000 records per hour.
Certain activities can trigger a sync, which can occur at a prospect, trigger, or system level. We recommend reviewing a comprehensive guide to Account Engagement and Salesforce sync behaviors for newcomers to this topic or to validate your current sync settings for accuracy and error-free operations.
Part 2 – Setting Up Lead Assignment
Planning Lead Assignment and Criteria Assuming successful integration and syncing of accounts, you’re now poised to plan and implement lead assignment using predefined criteria.
Differentiate between implicit and explicit leads based on lead scoring and grading:
- Explicit leads: Ideal fits for your business based on demographics, such as decision-makers in the right type of company or industry.
- Implicit leads: Prospects displaying strong interest and buying intent.
The perfect sales-ready or marketing qualified lead will meet both explicit and implicit criteria. Therefore, your first task is to collaboratively define and document what constitutes a qualified lead, involving both marketing and sales teams.
Only after establishing a clear definition of a sales-ready lead can you proceed to map out who should receive such leads, when, and how. Consider the following:
- Do sales team members cover specific regions or countries?
- Are priority team members designated to receive leads first?
- Should leads be assigned based on product or service interest (utilize Scoring Categories)?
- How should leads from different sources be handled?
Utilize these considerations to outline more precise criteria:
- Criteria 1: Unqualified leads – exclude those from unserviced regions.
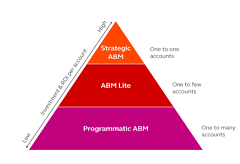
- Criteria 2: ABM leads – assign high-value targets to specific sales reps.
- Criteria 3: Country – assign remaining leads to country-specific sales teams.
Document your lead assignment plan offline before implementing changes in Salesforce accounts. This aids in gaining a clear understanding of the workflow and allows for validation before modifying settings that could lead to issues later. For that matter you should always document system modifications.
Creating a Lead Assignment Rule in Salesforce
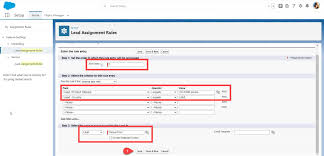
Navigate to the ‘Marketing’ section in Salesforce and access ‘Lead Assignment Rules.’ Here, you can create a Lead Assignment Rule; note that only one rule can be active at a time.
Specify the processing order for each criterion when creating a rule, prioritizing the most important criteria first.
Once criteria are entered (ensuring you have necessary data values to match the rule), select the assignment action:
- User: Assign to a specific Salesforce user by name.
- Queue: Assign to a queue for distribution among a team.
- Partner User: Assign to a partner account user.
To assign a lead to a ‘Queue,’ first create the Queue in Salesforce’s Administration > Users > Queues section. For instance, set up Queues for each region’s sales team with relevant users as members (e.g., ‘Leads – UK’ or ‘Leads – Germany’).
Once activated, all leads will be assigned based on the active rule. Consider adding a final criteria to catch all other leads and assign them to a default user or queue for review and manual assignment if needed.
Triggering LARs from Account Engagement/Marketing Cloud
Lead assignment complexities arise when determining how leads are assigned in Salesforce via Account Engagement or Marketing Cloud.
Account Engagement
In Account Engagement, formerly Pardot, prospects must have an assigned user to sync with Salesforce initially. However, an assigned user bypasses the Salesforce Lead Assignment Rule.
For organizations preferring a Lead Assignment Rule in Salesforce to automate large lead volumes among multiple users, select ‘Assign Prospect Via Salesforce Active Assignment Rule’ within the Completion Actions (for forms, form handlers, custom redirects, emails, and page actions), Automation Rules, or Engagement Studio programs. This triggers the Salesforce Lead Assignment Rule when criteria are met and prospects sync without an owner, allowing the LAR to assign leads accordingly.
Marketing Cloud
Triggering LARs in SFMC requires leveraging tools within Journey Builder to update records in Sales Cloud. This enables logic flow construction to determine lead routing based on specific criteria such as random assignment, round-robin distribution, working hours, or lead profiles.
Troubleshooting LARs That Aren’t Working
If Lead Assignment Rules aren’t functioning as expected, consider common issues:
- Ensure the LAR is ‘Active’; activate the checkbox as only one rule can be active.
- When manually creating leads in Salesforce, select the ‘Lead Assignment’ checkbox to trigger the rule.
- Prospects already assigned to a user in Account Engagement bypass the LAR; opt for ‘Assign Prospect Via Salesforce Active Assignment Rule’ instead.
- LARs trigger for new leads upon creation, not for existing leads.
- Check rule criteria for errors in operator usage or rule configuration.
Ready to Qualify and Assign Leads?
Confident lead assignment in Salesforce necessitates a shared understanding of what constitutes a ‘sales-ready lead’ for your business. Collaboratively defining this definition ensures streamlined lead management and effective utilization of Salesforce’s lead assignment capabilities.
Lead Assignment Automation for Salesforce
By Salesforce Marketing Solutions Architect, Shannan Hearne
Who is Salesforce? Here is their story in their own words. From our inception, we've proudly embraced the identity of Read more

Salesforce Marketing Cloud Transactional Emails are immediate, automated, non-promotional messages crucial to business operations and customer satisfaction, such as order Read more

Salesforce has unveiled a comprehensive analytics solution tailored for wealth managers, home office professionals, and retail bankers, merging its Financial Read more
AI plays a crucial role in propensity score estimation as it can discern underlying patterns between treatments and confounding variables Read more