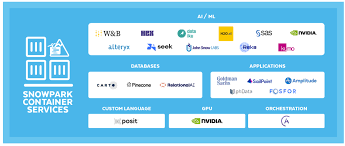
Snowpark Container Services is a fully managed solution designed to simplify deploying, managing, and scaling containerized applications within the Snowflake ecosystem.
Key Features
- Integration with Snowflake Ecosystem
Snowpark leverages Snowflake’s compatibility with BI tools, cloud services, and programming languages. The Snowflake Connector further enhances integration with Spark-based tools and applications. - Machine Learning Capabilities
Using Snowpark Python, developers can perform machine learning tasks, such as training models with stored procedures. - Broad Adoption Since 2021
Introduced in preview in 2021, Snowpark has been widely adopted by Snowflake customers and partners for diverse use cases. - Native Apps Framework
Snowflake’s Native Apps Framework empowers developers to create and deploy data applications within Snowflake’s platform.- Consumers (end users of the app) maintain control over what the app can access.
- Providers (app developers) decide whether their code remains private to protect intellectual property.
- Flexible Workloads with Snowpark Container Services
Developers can run custom workloads, including long-running services and jobs that terminate upon completion. These services can be written in any programming language, containerized, and executed on configurable hardware options, including GPUs.
Benefits of Snowpark Container Services in Native Apps
Integrating Snowpark Container Services into Snowflake Native Apps enables developers to create solutions for various use cases, including:
- AI/ML workloads
- Web applications
- Data analytics and processing tools
Developers benefit from Snowflake’s Native Apps Framework safeguards, which ensure secure and efficient operations.
Development Workflow for Snowpark Container Services
Here’s a quick guide to the development cycle for building and deploying containerized services within Snowflake.
1. Develop Code Locally
- For self-contained services, this stage mirrors standard container development practices.
- When interacting with Snowflake, credentials provided to containers enable secure connections for executing SQL and accessing Snowflake data.
2. Build and Push an Image
- Snowflake provides an OCI-compliant image registry for storing container images.
- Developers can create image repositories and push images using tools like Docker.
3. Provision Resources
- Snowflake simplifies resource management with compute pools—VM collections that host container services.
- Developers can configure compute pools with parameters like MIN_NODES and MAX_NODES.
- Snowflake handles autoscaling and idle-node removal to optimize resource usage.
4. Deploy and Test Services
- Deployment involves defining service configurations in the CREATE SERVICE command, including compute pools, query warehouses, and external access requirements.
- Use the SYSTEM$GET_SERVICE_STATUS function to monitor service readiness and test functionality.
Getting Started
To build containerized applications with Snowpark Container Services:
- Start by developing code locally and interacting with Snowflake where necessary.
- Build and push your container image to Snowflake’s registry.
- Configure compute pools to run your services efficiently.
- Deploy and test your service within Snowflake’s managed environment.
For a deep dive into architecture and workflows, explore Snowflake’s guides and tutorials on Snowpark Container Services and Native Apps.
The Snowflake Native Applications Framework allows developers to package Snowflake features into standalone applications that can be installed across multiple accounts. This framework now supports advanced features for managing resource provisioning and deploying container services. Below is an overview of how to integrate container services into a Native App.
Key Components
1. Manifest File
The manifest file defines the configuration and setup properties for the application, including:
- Setup script location
- Versioning and metadata
- Logging configurations
- Specification of container images
Example Manifest File: Specifying Container Images
yaml
Copy code
manifest_version: 1
version:
name: V1
label: “Version One”
comment: “The first version of my amazing Snowflake Native App”
artifacts:
readme: readme.md
setup_script: scripts/setup.sql
container_services:
images:
– /provider_db/provider_schema/provider_repo/server:prod
– /provider_db/provider_schema/provider_repo/web:1.0
Here:
- /provider_db/provider_schema/provider_repo is the path to the image repository in the provider’s account.
- server:prod and web:1.0 are the image names with their respective tags.
Setting a Web UI as the Landing Page
For apps with a web UI, specify a default_web_endpoint field to make the UI the landing page.
yaml
Copy code
default_web_endpoint:
service: ux_schema.ux_service
endpoint: ui
Here, service corresponds to the name defined in the CREATE SERVICE command, and endpoint refers to the service’s endpoint in the specification file.
Using Streamlit as a Landing Page
Alternatively, you can specify a default_streamlit field to use Streamlit as the landing page.
Note: default_web_endpoint and default_streamlit are mutually exclusive—you can only use one.
2. Setup Script
The setup script executes during the application installation and upgrade processes. It contains SQL statements for creating:
- Database objects (e.g., tables, views)
- Stored procedures and functions
- Application roles
Resource Provisioning for Snowpark Container Services
The setup script also includes logic for provisioning resources like compute pools. However, these provisioning procedures are executed post-installation to ensure the consumer has granted the necessary privileges.
Managing Compute Pools and Privileges
Consumer-Controlled Resource Provisioning
A foundational principle of the Snowflake Native Apps Framework is that consumers maintain full control over the resources the application accesses. This includes compute resources.
Privileges Required
To enable an application to provision resources, specific privileges must be requested in the manifest file:
- CREATE COMPUTE POOL: Grants the ability to create compute pools.
- BIND SERVICE ENDPOINT: Allows the app to expose service endpoints.
Example Privileges in the Manifest File
yaml
Copy code
privileges:
– CREATE COMPUTE POOL
description: “Enable application to create its own compute pool(s)”
– BIND SERVICE ENDPOINT
description: “Enables application to expose service endpoints”
Note: These privileges are not granted by default. The installation user may need to request them from another user with the appropriate permissions within the organization.
By wrapping container services into a Snowflake Native App, developers can:
- Simplify application deployment across multiple accounts.
- Leverage the Snowflake ecosystem for secure resource provisioning and service management.
- Customize application behavior with flexible configuration options, such as default landing pages and compute pool provisioning.
This approach ensures that both providers and consumers retain control over their resources and data, while maximizing the capabilities of Snowflake Native Apps.
Managing Privileges and Deploying Services in Snowflake Native Apps
Once a Snowflake Native App is installed, consumers can grant the necessary privileges through various supported mechanisms. Here’s an overview of how to configure privileges, deploy services, and manage app components effectively.
Granting Privileges
1. Snowsight UI Configuration
Snowflake Native Apps with Snowpark Container Services provide a custom Snowsight configuration UI. When privileges are granted via this UI, it triggers the app’s grant_callback procedure specified in the manifest file.
This procedure receives a list of privileges as input, making it ideal for initiating resource provisioning, such as creating compute pools. For containerized apps, this is the recommended approach.
Example Manifest Configuration:
yaml
Copy code
manifest_version: 1
configuration:
log_level: debug
trace_level: always
grant_callback: setup.grant_callback
2. Streamlit Integration
Using Snowflake’s Permissions SDK, developers can create Streamlit-based pop-ups to request privileges. After privileges are granted through the pop-up, resource provisioning can begin.
Specify Streamlit as the landing page in the manifest using the default_streamlit field. This configuration allows Streamlit to invoke the necessary resource provisioning procedures.
3. SQL Worksheet
Consumers preferring SQL-based interaction can grant privileges and execute resource provisioning procedures directly through the SQL worksheet.
Example Grant Callback Procedure:
sql
Copy code
CREATE OR REPLACE PROCEDURE setup.grant_callback(privileges ARRAY)
RETURNS STRING
AS $$
BEGIN
CREATE COMPUTE POOL IF NOT EXISTS backend_compute_pool
MIN_NODES = 1
MAX_NODES = 1
INSTANCE_FAMILY = CPU_X64_XS;
CALL services.start_backend(‘backend_compute_pool’);
RETURN ‘Callback successful’;
END;
$$;
GRANT USAGE ON PROCEDURE setup.grant_callback(ARRAY) TO APPLICATION ROLE app_public;
This procedure creates a compute pool and then calls another procedure to set up services within the pool.
Deploying Services
Once compute pools are created, the application can deploy one or more services.
Scenario 1: The App Has All Required Resources
If the app has everything it needs, it can directly execute CREATE SERVICE commands in the grant_callback procedure to set up its services.
For services requiring warehouses, the app can request the CREATE WAREHOUSE privilege in the manifest and create warehouses as needed.
Scenario 2: The App Needs Additional Consumer Resources
If the app requires additional objects (e.g., external access integrations or secrets) from the consumer, references can be used.
A reference includes a register_callback procedure that binds the required resources. This procedure can also trigger service creation after the reference is bound.
Example Register Callback Procedure:
sql
Copy code
CREATE OR REPLACE PROCEDURE v1.register_single_callback(ref_name STRING, operation STRING, ref_or_alias STRING)
RETURNS STRING
LANGUAGE SQL
AS $$
BEGIN
CASE (operation)
WHEN ‘ADD’ THEN
SELECT SYSTEM$SET_REFERENCE(:ref_name, :ref_or_alias);
CASE (:ref_name)
WHEN ‘external_access_backend_reference’ THEN
CALL services.start_service_with_egress();
WHEN ‘secret_reference’ THEN
CALL services.start_service_using_secret();
END CASE;
WHEN ‘REMOVE’, ‘CLEAR’ THEN
SELECT SYSTEM$REMOVE_REFERENCE(:ref_name);
ELSE
RETURN ‘Unknown operation: ‘ || operation;
END CASE;
RETURN ‘Operation ‘ || operation || ‘ succeeds.’;
END;
$$;
This procedure:
- Binds resources (e.g., external access or secrets).
- Triggers service creation based on the bound references.
Packaging Service Specifications
Service creation requires specification files, which must be included in the app package (typically alongside the manifest.yml). These files define the service details used in CREATE SERVICE commands.
Publishing a Snowflake Native App
The steps for packaging and publishing a Snowflake Native App with Snowpark Container Services align with the standard Snowflake app publishing process.
Additional Considerations
Stay tuned for further insights on:
- Configuring External Access for Snowflake Native Apps with Snowpark Container Services.
- Working with Service Roles to manage service ingress.
For hands-on experience, explore the tutorial: “Create a Snowflake Native App with Snowpark Container Services.”
Bonus: Snowpipe Overview
Snowpipe is Snowflake’s Continuous Data Ingestion Service, enabling automatic micro-batch data loading as soon as files are staged. This eliminates the need for manual or scheduled large-batch COPY operations, streamlining data workflows.
🔔🔔 Follow us on LinkedIn 🔔🔔
Content updated January 2025.

